My 3-year-old made green onion pancakes for our dinner the other day. And I have to say, they came out pretty well.
I love saying that! Anyhow, a lot of friends have asked about our pancake-making, so I decided to write about it.
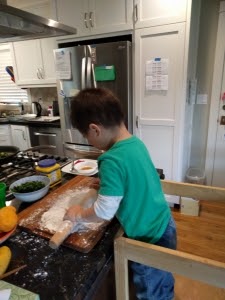
We started making green onion pancakes about a year ago, when my son was two. Ironically, before that, I’d eaten plenty of green onion pancakes…but I’d only made them once or twice. Then, one day, caught between getting dinner ready and entertaining my toddler during dinner prep time, I was inspired. Making green onion pancakes involves the perfect toddler activities — you scoop and pour flour and corn starch, use a giant spoon to mix ingredients, get your hands dirty kneading dough and eat.
One of the best things about these pancakes is that you really can let your toddler just go for it. You don’t need to be precise with any of your measurements. In fact, I have to confess that until I started writing up the instructions below, I never really thought about precisely how much flour, corn starch, etc to use. So for the best possible recipe, please search online – what I’ve focused on below is how we make this into a toddler-friendly, Chinese cooking activity!
Here’s how we do it:
- Scoop a couple cups of all-purpose flour onto a cookie tray. Make a giant hole in the middle and pour hot water into it. We use about 2 cups of flour for ~3/4 cup of water. Knead until dough is very soft. It’s extremely forgiving, which is exactly what we need! Note: I let my toddler stir with a spatula once the hot water turns warm, and then help out with the kneading. He really gets into it! He’s pretty good, and I’m excited for the day he can take this over completely.
- Place dough in a bowl, cover with a damp towel and let sit for at least half an hour. This step is critical! It makes the dough much easier to work with.
While the dough is resting, we have separate jobs.
- Job for my toddler: We use a giant cutting board and let him “flour” the cutting board and rolling pin with corn starch. He scoops out the corn starch into a corner of the cookie tray and then starts flouring.
- Job for me: Chop up green onions
- Together: Pour out sesame oil into a small bowl
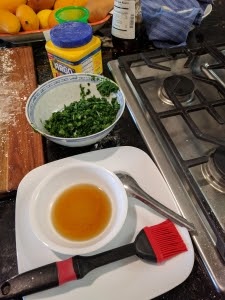
Here’s our setup. You can see the chopped green onions, the bowl of sesame oil, the pastry brush and the very edge of the floured cutting board. In the upper far right corner, you can see the damp kitchen towel covering the bowl of dough. Note: I’ve also found it super helpful to put out an extra plate or bowl, and make that the “default” plate where everything goes. It cuts down on the cleaning just a touch, but every bit less cleaning helps!
After half an hour
- Take about a quarter of the dough, and roll it out. Whatever dough you don’t use, put it back in the bowl and cover it. [Note: My son is really into learning how to cut, so I’ll sometimes let him take a butter knife and cut the dough into smaller pieces. Otherwise, I let him just rip the dough with his hands into smaller chunks.]
- Once the dough is rolled out, use the pastry brush to spread sesame oil over the dough evenly. The brush is handy because you don’t need to dirty your hands as much. Honestly, though, I probably wouldn’t have bought the pastry brush just for green onion pancakes. However, my husband is really into cooking and baking, and he’s got a lot of kitchen tools. So this is just one more fun tool for my son to use.
- Sprinkle green onions (as much or little as you like)
These next few steps are to create multiple layers in your green onion pancake
- Roll up the dough. What you want is a long, rolled up piece of dough. Surprisingly, my toddler was really good at this. Apparently, they roll up all sorts of things at preschool — blankets, towels, paper, etc.
- Then coil up the dough like a rope.
- Roll out the dough again
Cooking!
- Fry your green onion pancake in a frying pan! We use sesame oil to add to the flavor. And we also add a bit of water to help it cook (that’s because we make our pancakes a bit thicker, and we’ve found when we don’t add water it turns out drier in the middle than we’d like).
- Eat!
We usually make more than we can eat in one sitting. We store the extras in the freezer in a glass container with lid (Pyrex). The first time we tried this, we found that the separate pancakes all stuck together when they froze. To prevent this from happening again, we now put parchment paper between the pancakes. We also put parchment paper on the bottom of the glass container to prevent the pancakes from sticking to the container itself!
I am always looking for new ways to include my toddler in preparing food, and would love to know what other easy home recipes you have your toddlers help out with!